
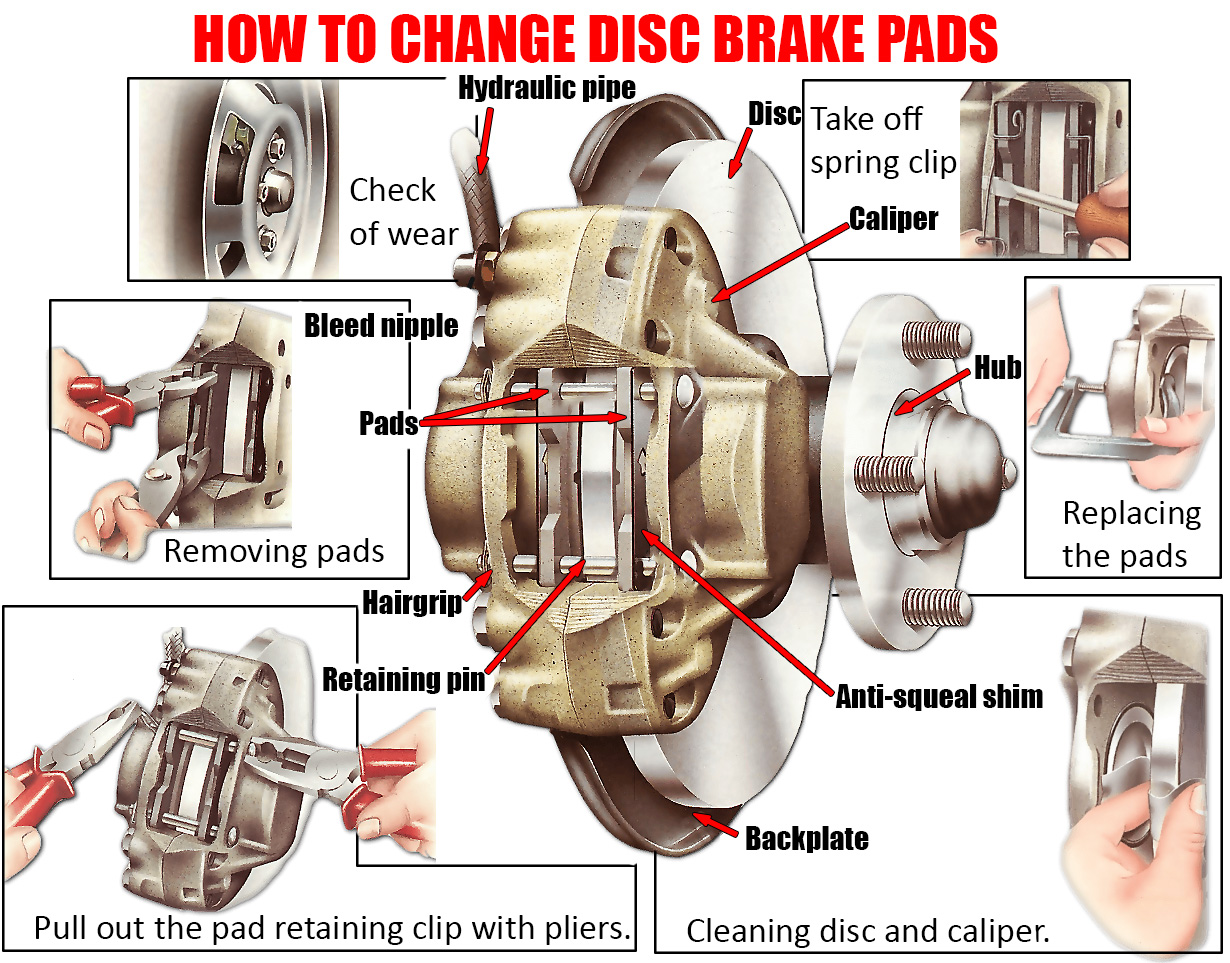
Changing disc brake pads is a maintenance task that ensures your vehicle’s braking system functions properly. Knowing when and how to replace worn brake pads can help you avoid more serious problems, such as brake failure or damage to the brake disc. In this guide, we’ll walk through the process of replacing disc brake pads and share some tips to ensure a smooth and safe installation.
1. When to Replace Brake Pads
It’s important to replace brake pads before they wear down too much. Manufacturers typically recommend replacing pads when the friction material is between 1.6mm and 3.2mm thick, depending on the specific vehicle. Waiting until the pad wears down to its metal backing can cause the brake disc to become damaged or even lead to brake failure. Regularly check the condition of your brake pads through the inspection holes in the wheels, or by removing the wheels if necessary.
A drop in the brake fluid level can also signal that your brake pads are wearing out. As the pads wear, the caliper pistons move inward, causing the fluid level in the reservoir to lower. If the fluid is low, also inspect for leaks, as they could indicate a more serious problem.
2. Gathering the Right Tools and Parts
Before you begin, make sure you have the necessary tools and a high-quality set of replacement pads. Only purchase reputable brands, and be sure the kit includes all the necessary components, such as pads, pins, springs, and shims. Always replace the pads on both wheels of an axle set, never on just one wheel.
Essential Tools:
- Pliers
- Screwdrivers (flathead)
- G-clamp or valve-spring compressor
- Brake cleaner or methylated spirits
- Lint-free rag
- Emery cloth
- Torque wrench (optional)
3. Removing the Old Brake Pads
On most vehicles, you can replace the brake pads without removing the calipers entirely. The pads are usually held in place by pins that pass through the caliper. To begin:
- Remove the pins: Use pliers to extract the small wire clips (also known as “hairgrips”) that secure the pins. Pull the pins out, and the brake pads should slide free.
- Remove the pads: Grip the pads with two pairs of pliers and pull evenly from both the top and bottom. If the pads are stuck, wiggle them side to side to loosen them. If your vehicle has metal anti-squeal shims behind the pads, be careful to note their orientation for reassembly.
The two brake pads may be slightly different in shape, so be sure to note which pad fits where.

4. Preparing to Install New Pads
New brake pads are thicker than the old ones, so you’ll need to push the brake pistons back into the caliper to make room. You can do this using a G-clamp or valve-spring compressor:
- Press the pistons back: Position the G-clamp over the caliper and tighten it slowly, pushing the pistons back into their housings. Be careful not to damage the piston or the surrounding seals.
As you press the pistons back, brake fluid will be forced back into the master cylinder reservoir. Make sure to wrap the reservoir with an absorbent rag to prevent any spills on the paintwork, as brake fluid can cause damage. If fluid does spill, wipe it off immediately.

5. Cleaning the Caliper and Disc
Before fitting the new pads, thoroughly clean the caliper housing and the exposed part of the piston. Any dirt that enters the caliper can lead to malfunction, so it’s crucial to ensure everything is clean. Use a small brush dipped in brake cleaner or methylated spirits to remove debris. If the brake disc has any rust, use a screwdriver and emery cloth to clean it off.
6. Fitting the New Pads
Once everything is clean and the pistons are pressed back:
- Test-fit the new pads: Make sure they slide smoothly into place. You may need to scrape excess paint from the edges of the backing plates if they are too tight. Be cautious about removing paint, as it can prevent corrosion.
- Apply brake grease: Apply a light coating of brake grease or anti-squeal compound to the back of the pads and the fronts of the shims, if applicable. Be very careful not to get any grease on the friction material or brake disc.
Insert the new pads into the caliper, ensuring they fit securely and are oriented correctly. If the pads came with new retaining pins and clips, use them to secure the pads in place.
7. Reassembly and Final Checks
- Reconnect any sensor leads: Some brake pads have wear sensors that need to be reconnected during reassembly.
- Refit the wheels: Once the new pads are installed and secured, refit the wheels and lower the vehicle back to the ground.
- Pump the brake pedal: Before driving, press the brake pedal several times to help seat the new pads and ensure they make full contact with the brake disc.
- Check the fluid level: After replacing the pads, check the brake fluid level in the master cylinder reservoir and top it off if necessary.
8. Breaking in the New Pads
Drive carefully for the first few hundred miles after changing the brake pads. It takes time for new pads to bed in and reach optimal braking performance. During this period, avoid heavy braking and allow the pads to wear in smoothly.

Replacing disc brake pads is a relatively straightforward task that can be performed with basic tools and mechanical knowledge. Regularly inspecting and maintaining your brake pads not only extends the life of your braking system but also ensures your vehicle remains safe on the road. By following these steps, you can confidently change your brake pads and enjoy improved braking performance.
Make sure to refer to your vehicle’s manual for any specific guidelines or variations, as brake systems can differ between models. Happy wrenching!