
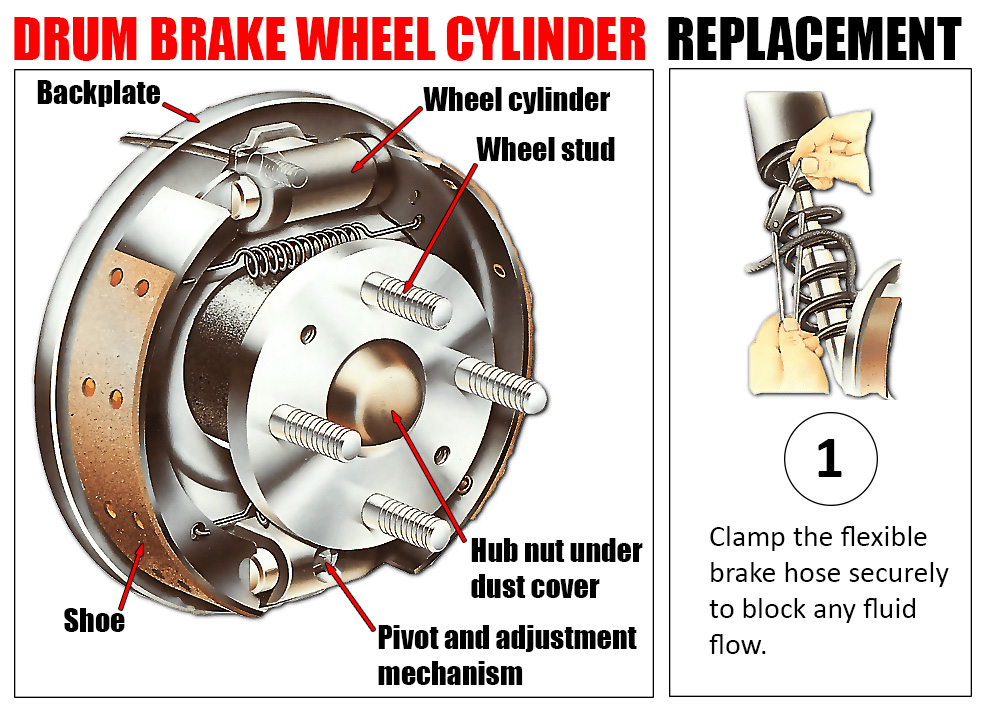
The wheel cylinder in a drum brake system is a component that applies pressure to the brake shoes, pushing them against the drum to slow the vehicle. Over time, these cylinders can develop leaks or become stuck, requiring replacement. Here’s a detailed guide to replacing a drum brake wheel cylinder.
1. Preparing for Cylinder Removal
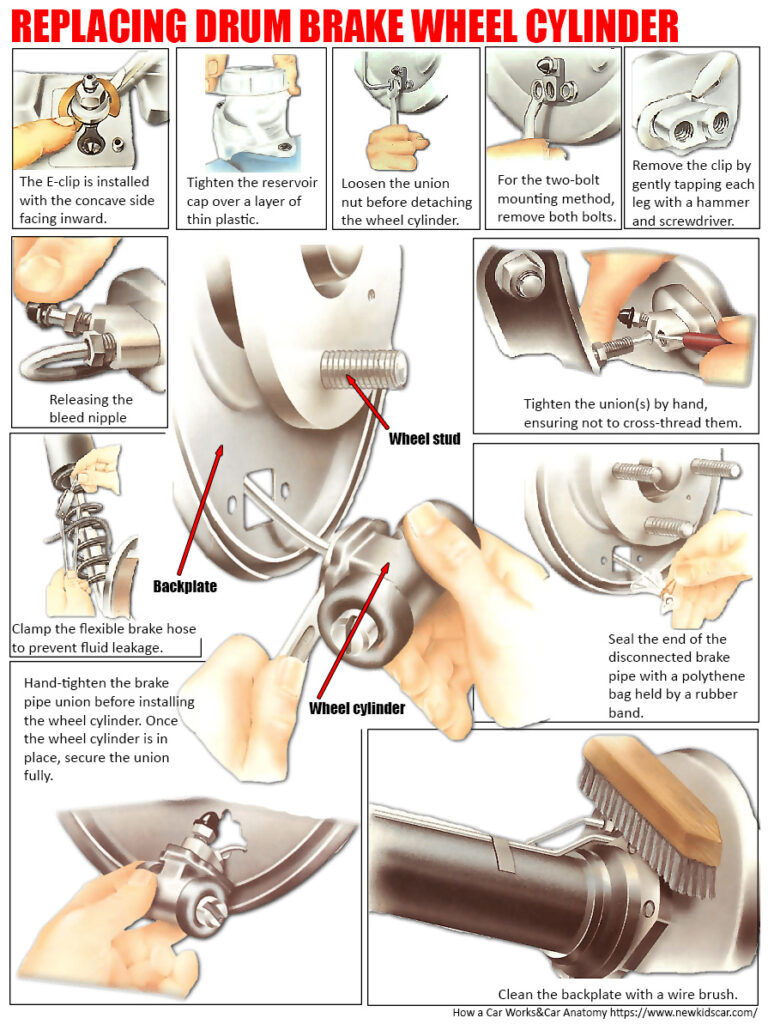
Before starting, it’s important to minimize brake fluid loss. First, remove the master cylinder reservoir cap and cover the reservoir with a thin plastic sheet, then screw the cap back on. This creates a vacuum that prevents fluid from escaping. If there’s a flexible hose connected to the brake, use a brake-hose clamp to prevent damage while sealing the line.
2. Removing the Brake Drum and Shoes
With the car safely lifted, remove the brake drum and shoes to access the wheel cylinder. On rear brakes with a live axle, clamp the flexible hose connecting the chassis brake pipe to the one on the axle.
3. Detaching the Cylinder
Loosen the brake-pipe union at the rear of the wheel cylinder. Depending on the design, the cylinder may be attached with bolts, nuts, or an E-clip. Apply penetrating oil to the bolts a few hours beforehand if they are stiff.
- Single Bolt Design: If the cylinder is fixed with one bolt, simply remove the nut and lock washer to free it.
- Two Bolt Design: If secured by two bolts, remove both to detach the cylinder. A gasket between the cylinder and backplate may need to be replaced.
For models with an E-clip, use a screwdriver to lever off the clip and discard it. Install a new clip when reassembling.
4. Removing a Sliding Cylinder
In some designs, the cylinder slides through a slot in the backplate. Two interlocking spring clips usually hold it in place. Gently pull back the dust cover, tap the spring clips alternately with a hammer and screwdriver, and slide them off.
You may need to remove the handbrake lever arm for clearance. Clean both sides of the slot in the backplate and apply brake grease before reassembly.
5. Disconnecting the Brake Pipe
When detaching the brake pipe, loosen the union nut before removing the cylinder. Use the wheel cylinder to pull the brake pipe an inch or two through the backplate. Hold the union nut steady with a spanner and unscrew the cylinder to avoid twisting the pipe.
Union nuts can be corroded and stiff, so apply penetrating oil before removal. Always use a well-fitting spanner to avoid damaging the nut. If the nut is difficult to remove, use a self-locking wrench to break it loose.
6. Reassembling the Wheel Cylinder
Clean the backplate and pipe unions before reassembly. Wire-brush any rust or dirt, ensuring the union nuts are clean and smooth. Screw the unions finger-tight to avoid cross-threading and ensure the brake pipe’s belled end is clean.
Fit the new wheel cylinder by reversing the removal steps. Be cautious not to twist the brake pipe when tightening the union nuts.
Replacing a drum brake wheel cylinder requires careful attention to prevent damage to the brake system. By following these steps, you can ensure a proper, leak-free installation that restores your vehicle’s braking performance.